Continuous Availability File Windows Server 2016
Installing and creating a Failover Cluster
Information about how to install the Failover Clustering feature, creating and troubleshooting a Windows Server 2012 Failover Cluster see these blog posts:
- Installing the Failover Cluster Feature and Tools in Windows Server 2012
- Creating a Windows Server 2012 Failover Cluster
- How to Troubleshoot Create Cluster failures in Windows Server 2012
Installing the File Server role
Once the Failover Cluster is up and running, we can install the File Server role. Do the following for each node in the Failover Cluster:
Graphical User Interface
- Start Server Manager
- Click Add roles and features
- In the Add Roles and Features Wizard, do the following :
- In Before you begin , click Next
- In Select installation type , click Next
- In Select destination server , choose the server where you want to install the File Server role, and click Next
- In Select server roles , expand File And Storage Services , expand File and iSCSI Services , and check the check box for File Server and click Next
- In Select features , click Next
- In Confirm installation selections , click Install

Figure 1 – Installing File Server role
PowerShell
In an elevated PowerShell shell, do the following:
Add-WindowsFeature -Name File-Services
Create clustered File Server
Once the File Server role is installed on all cluster nodes, we can create a clustered file server. In this example we will create a clustered file server of type "File Server for general use" and name it SMBFS. I will provide more information on "Scale-Out File Server for application data" in a follow-up blog post.
Do the following to create a clustered file server.
Graphical User Interface
- Start Server Manager
- Click Tools and select Failover Cluster Manager
- In the console tree , do the following
- Select and expand the cluster you are managing
 Figure 2 – Select File Server Type
  Figure 3 – Configure Client Access Point
Figure 4 – Select Storage
PowerShell
In an elevated PowerShell shell, do the following:
Add-ClusterFileServerRole -Name SMBFS -Storage "Cluster Disk 1" -StaticAddress 192.168.9.99/24
Create a file share that is continuously available
Now that we have created the clustered file server, we can create file shares that are continuously available. In this example we will create a file share named "appstorage" on the clustered file server we created previously.
Do the following to create a file share that is continuously available:
Graphical User Interface
- Start Server Manager
- Click Tools and select Failover Cluster Manager
- In the console tree , do the following
- Select and expand the cluster you are managing
 Figure 5 – Select Profile
 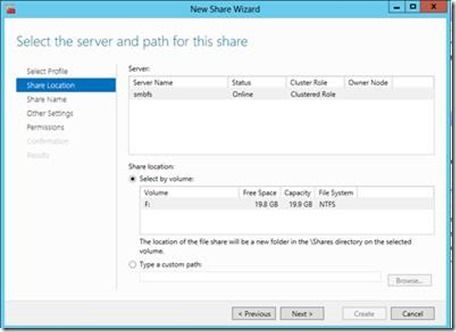 Figure 6 – Select server and path
Figure 7 – Share Name
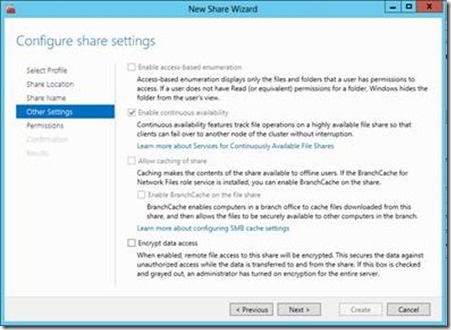
Figure 8 – Configure Share Settings
To verify a share has the continuously available property set, do the following:
- Start Server Manager
- Click Tools and select Failover Cluster Manager
- In the console tree , do the following
- Select and expand the cluster you are managing
PowerShell
These steps assume the folder for the share is already created. If this is not the case, create folder before continuing.
In an elevated PowerShell shell on the cluster node where the clustered file server is online, do the following to create a file share with continuous availability property set:
New-SmbShare -Name AppStorage –Path f:\appstorage –Scope smbfs –FullControl smbtest\administrator
In an elevated PowerShell shell on the cluster node where the clustered file server is online, do the following to verify a file share has continuous availability property set.
Get-SmbShare -Name AppStorage | Select *
PresetPathAcl : System.Security.AccessControl.DirectorySecurity
ShareState : Online
AvailabilityType : Clustered
ShareType : FileSystemDirectory
FolderEnumerationMode : Unrestricted
CachingMode : None
CATimeout : 0
ConcurrentUserLimit : 0
ContinuouslyAvailable : True
CurrentUsers : 0
Description :
EncryptData : False
Name : appstorage
Path : F:\Shares\appstorage
Scoped : True
ScopeName : SMBFS
SecurityDescriptor : O:BAG:DUD:(A;OICI;FA;;;WD)
ShadowCopy : False
Special : False
Temporary : False
Volume : \\?\Volume{266f94b0-9640-4e1f-b056-6a3e999e6ecf}\
Note that we didn't request the continuous availability property to be set. This is because the property is set by default. If you want to create a file share without the property set, do the following:
New-SmbShare -Name AppStorage -Path f:\appstorage -Scope smbfs –FullControl smbtest\administrator -ContinuouslyAvailable:$false
Using a file share that is continuously available
Now that we have created a clustered file server with a file share that is continuously available, let's go ahead and use it.
The below diagram illustrates the setup that I will be using in this section.

Figure 9 – Clustered File Server
On the file share is a 10GB data file (testfile.dat) that is being accessed by an application on the SMB client computer (FSF-260403-10). The below screenshot shows the SMB Client Shares performance counters for \\smbfs\appstorage share as seen from the SMB Client. As you can see the application is doing 8KB reads and writes.

Figure 10 – Data Access
Zeroing in on data requests/sec in graph form, we see the following:

In an elevated PowerShell shell on the cluster node where the clustered file server is online, do the following to:
Get-SmbOpenFile | Select *
ClientComputerName : [2001:4898:e0:32af:890b:6268:df3b:bf8]
ClientUserName : SMBTEST\Administrator
ClusterNodeName :
ContinuouslyAvailable : True
Encrypted : False
FileId : 4415226380557
Locks : 0
Path : F:\Shares\appstorage\testfile.dat
Permissions : 1180059
ScopeName : SMBFS
SessionId : 4415226380341
ShareRelativePath : testfile.dat
Planned move of the cluster group
With assurance that the file handle is indeed continuously available, let's go ahead and move the cluster group to another cluster node. In an elevated PowerShell shell on one of the cluster nodes, do the following to move the cluster group:
Move-ClusterGroup -Name smbfs -Node FSF-260403-08
Name OwnerNode State
—- ——— —–
smbfs FSF-260403-08 Online
Looking at Data Requests/sec in Performance Monitor, we see that there is a short brown-out where IO is stalled of a few seconds while the cluster group is moved, but continues uninterrupted when the cluster group has completed the move.
The tear down and setup of SMB session, connections and active handles between the SMB client and the SMB server on the cluster nodes is handled completely transparent to the application. The application does not see any errors during this transition, only a brief stall in IO.

Figure 11 – Move Cluster Group
Let's take a look at the operational log for SMB Client in Event Viewer (Applications and Services Log – Microsoft – Windows – SMB Client – Operational) on the SMB Client computer.
In the event log we see a series of warning events around 9:36:01PM. These warning events signal the tear down of SMB connections, sessions and shares. There is also a series of information events around 9:36:07PM. These information events signal the recovery of SMB sessions, connections and shares. These events are very useful in understanding the activities during the recovery and that the recovery was successfulJ

Figure 12 – Events for planned move
So how does SMB Transparent Failover actually work? When the SMB client initially connects to the file share, the client determines whether the file share has the continuous availability property set. If it does, this means the file share is a clustered file share and supports SMB transparent failover. When the SMB client subsequently opens a file on the file share on behalf of the application, it requests a persistent file handle. When the SMB server receives a request to open a file with a persistent handle, the SMB server interacts with the Resume Key filter to persist sufficient information about the file handle, along with a unique key (resume key) supplied by the SMB client, to stable storage.
If a planned move or failure occurs on the file server cluster node to which the SMB client is connected, the SMB client attempts to reconnect to another file server cluster node. Once the SMB client successfully reconnects to another node in the cluster, the SMB client starts the resume operation using the resume key. When the SMB server receives the resume key, it interacts with the Resume Key filter to recover the handle state to the same state it was prior to the failure with end-to-end support (SMB client, SMB server and Resume Key filter) for operations that can be replayed, as well as operations that cannot be replayed. Resume Key filter also protects the handle state after failover to ensure namespace consistency and that the client can reconnect. The application running on the SMB client computer does not experience any failures or errors during this operation. From an application perspective, it appears the I/O operations are stalled for a small amount of time.
To protect against data loss from writing data into an unstable cache, persistent file handles are always opened with write through.
Unplanned failure of the active cluster node
Now, let's introduce an unplanned failure. The cluster group was moved to FSF-260403-08. Since all these machines are running as virtual machines in a Hyper-V setup, I can use Hyper-V manager to reset FSF-260403-08.
Looking at Data Requests/sec in Performance Monitor, we see that there is a slightly longer brown-out where IO is stalled. In this time period cluster detects that FSF-260403 has failed and starts the cluster group on another node. Once started, SMB can perform transparent recovery.
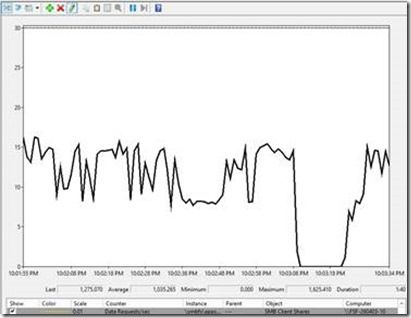
Figure 13 – Unplanned Failure
And again the SMBClient event log shows events related to the event:
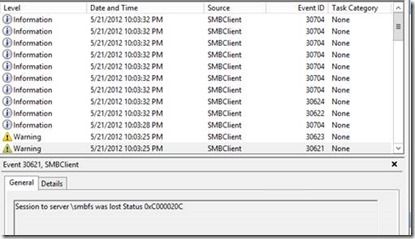
Figure 14 – Events for unplanned failure
Now you will probably ask yourself: "Wait a minute. SMB is running over TCP and TCP timeout is typically 20 seconds and SMB uses a couple of them before determining the cluster node failed. So how come the recovery is ~10 seconds and not 40 or 60 seconds??"
Enter Witness service.
Witness service was created to enable faster recovery from unplanned failures, allowing the SMB client to not have to wait for TCP timeouts. Witness is a new service that is installed automatically with the failover clustering feature. When the SMB client initially connects to a cluster node, the SMB client notifies the Witness client, which is running on the same computer. The Witness client obtains a list of cluster nodes from the Witness service running on the cluster node it is connected to. The Witness client picks a different cluster node and issues a registration request to the Witness service on that cluster node. The Witness service then listens to cluster events related to the clustered file server the SMB client is connected to.
If an unplanned failure occurs on the file server cluster node the SMB client is connected to, the Witness service on the other cluster node receives a notification from the cluster service. The Witness service notifies the Witness client, which in turns notifies the SMB client that the cluster node has failed. Upon receiving the Witness notification, the SMB client immediately starts reconnecting to a different file server cluster node, which significantly speeds up recovery from unplanned failures.
You can examine the state of the Witness service across the cluster using the Get-SmbWitnessClient command. Notice that Get-SmbWitnessClient can be run on any cluster node and provides a cluster aggregate view of Witness service, similar to Get-SmbOpenFile and Get-SmbSessions. In an elevated PowerShell shell on one of the cluster nodes, do the following to:
Get-SmbWitnessClient | select *
State : RequestedNotifications
ClientName : FSF-260403-10
FileServerNodeName : FSF-260403-08
IPAddress : 2001:4898:E0:32AF:3256:8C83:59E5:BDB5
NetworkName : SMBFS
NotificationsCancelled : 0
NotificationsSent : 0
QueuedNotifications : 0
ResourcesMonitored : 1
WitnessNodeName : FSF-260403-07
Examining the above output (run before the unplanned failure), we can see the SMB client (FSF-260403-10) is currently connected to cluster node FSF-260403-08 (SMB connection) and has registered for witness notification for SMBFS with Witness service on FSF-260403-07.
Looking at Event Viewer (Applications and Services Log – Microsoft – Windows – SMBWitnessClient – Operational) on the SMB Client computer, we see that the Witness client received notification for SMBFS. Since the cluster group was moved to FSF-260403-07, which is also the Witness node for the Witness client, the following event shows the Witness client unregistering from FSF-260403-07 and registering with FSF-260403-09.
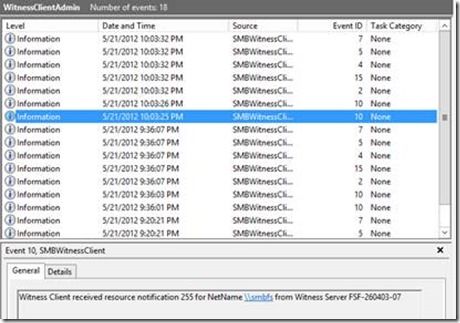
Figure 15 – Witness event log
Tips and Tricks
Protecting file server services
LanmanServer and LanmanWorkstation runs in service hosts with other services. In extreme cases other services running in the same service hosts can affect the availability of LanmanServer and LanmanWorkstation. You can configure these services to run in their own service host using the following commands:
sc config lanmanserver type= own
sc config lanmanworkstation type= own
The computer needs to be restarted for this change to take effect.
Loopback configurations
Accessing a file share, that has continuously available property set, as a loopback share is not supported.
For example, SQL Server or Hyper-V storing their data files on SMB file shares must run on computers that are not a member of the file server cluster for the SMB file shares.
Using legacy tools
When creating file shares, the continuous availability property is set by default on tools introduced in Windows Server 2012, including the new file share creation wizard and the New-SmbShare command. If you have automation built around using older tools, such as NET SHARE or Explorer or using the NET APIs the continuous availability property will not be set by default and these tools do not support setting it. To work around this issue you can set the following registry key, which will cause all shares to be created with the property set regardless if they support it or not:
Set-ItemProperty -Path "HKLM:\SYSTEM\CurrentControlSet\Services\LanmanServer\Parameters" EnableCaAlways -Value 1 –Force
Witness service
By default the network traffic between the Witness Client and Witness Server requires mutual authentication and is signed. However the traffic is not encrypted, as it doesn't contain any user data. It is possible to enable encryption of Witness network traffic.
To configure the Witness client to send traffic encrypted, set the following registry key on each client:
Set-ItemProperty -Path "HKLM:\SYSTEM\CurrentControlSet\Services\LanmanWorkstation\Parameters" WitnessFlags -Value 1 –Force
To configure the Witness Service to not accept unencrypted traffic, set the following registry key on each cluster node:
Set-ItemProperty -Path "HKLM:\SYSTEM\CurrentControlSet\Services\SMBWitness\Parameters" Flags -Value 1 –Force
Disabling NetBios over TCP/IP
I have seen disabling NetBios over TCP/IP speed up failover times. To disable NetBios over TCP/IP for an interface, do the following in Network Connections:
· Select the interface you want to modify, right-click and select Properties
· In interface properties, select Internet Protocol Version 4 (TCP/IPv4) and click Properties
· In Internet Protocol Version 4 (TCP/IPv4) Properties, click Advanced
· In Advanced TCP/IP Settings , click the WINS tab
· On the WINS tab, select the Disable NetBIOS over TCP/IP radio button
When disabling NetBIOS over TCP/IP it should be configured for all network interfaces on all cluster nodes.

Figure 16 – Disable NetBIOS over TCP/IP
Disable 8.3 name generation
SMB Transparent Failover does not support cluster disks with 8.3 name generation enabled. In Windows Server 2012 8.3 name generation is disabled by default on any data volumes created. However, if you import volumes created on down-level versions of Windows or by accident create the volume with 8.3 name generation enabled, SMB Transparent Failover will not work. An event will be logged in (Applications and Services Log – Microsoft – Windows – ResumeKeyFilter – Operational) notifying that it failed to attach to the volume because 8.3 name generation is enabled.
You can use fsutil to query and setting the state of 8.3 name generation system-wide and on individual volumes. You can also use fsutil to remove previously generated short names from a volume.
Conclusion
I hope you enjoyed this introduction to SMB Transparent Failover and agree how this feature is useful to provide continued access despite needing to occasionally restart servers when performing software or hardware maintenance or in the unfortunate event where a cluster node fails. Providing continued access to file share during these events is extremely important, especially for workloads such as Microsoft Hyper-V and Microsoft SQL Server.
I am looking forward to dive into Scale-Out File Server in a future post.
Claus Joergensen
Principal Program Manager
Windows File Server Team
hansonverlable1941.blogspot.com
Source: https://techcommunity.microsoft.com/t5/storage-at-microsoft/smb-transparent-failover-8211-making-file-shares-continuously/ba-p/425693
0 Response to "Continuous Availability File Windows Server 2016"
Post a Comment